Barcode Scanners Customer Displays Public Product List Scales
Email Accounts Websites
Pre Install Planning Creating a Franchise
Customer Receipts Customisation
Printing more, fewer, or no receipts
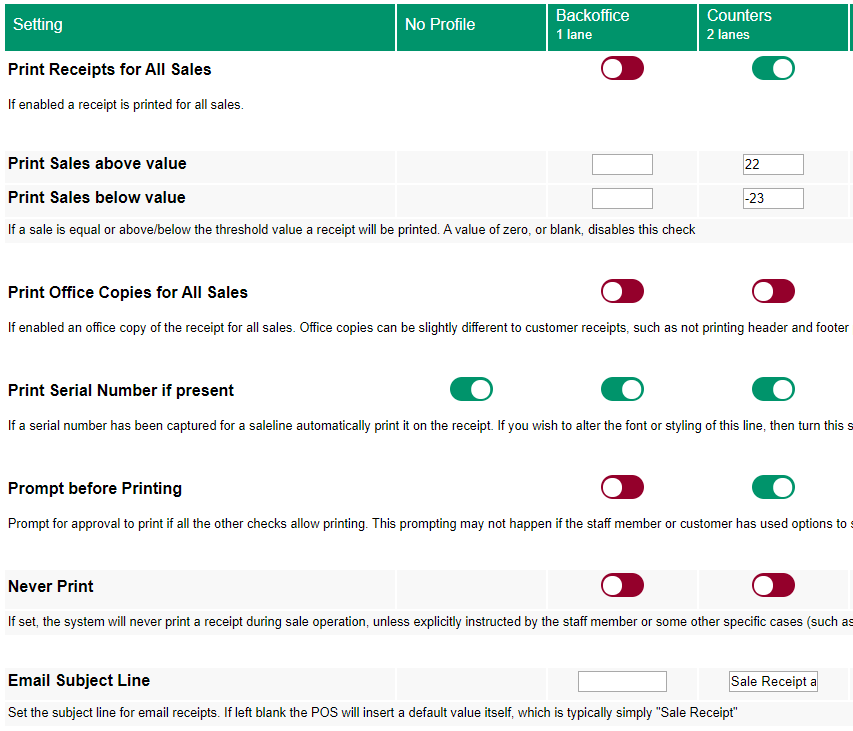
- From your main reporting page, click "settings" and then "Receipt Printing" which is in the "Retail Devices" section
- The option "Print Receipts For all sales" controls if the Pos will print a receipt for all sales by default, or if printing is initially disabled and must be specifically requested by the operator. Even if all sales is selected the options below can still disable it. Most sites have this turned on and then tailor off below.
- The options "Print Sales above value" and "Print sales below value" cause the pos to automatically print any sales the meet the threshold
- "Prompt before Printing" causes the Pos to ask the operator before each and every print request if it should be printed or not.
- It is also possible to mark customer or account records with email receipt options. If a customer/account is marked email receipt then the receipt is generated and automatically emailed to the given email address for them.
Integrated Eftpos Receipt Options
When integrated eftpos is used, the pinpad may print an eft receipt, or may ask the Pos to print it, or both. Exactly what happens depends on which Eftpos solution is in use.
Printing too many, or too few, eftpos receipts
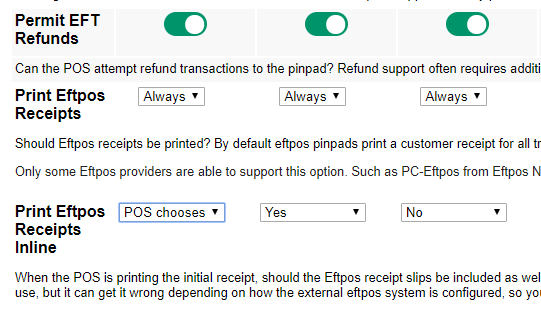
- From your main reporting page, click "settings" and then "Eftpos Terminals".
- There are two options available "Print Eftpos Receipts" and "Print Eftpos Receipts Inline"
- The option "Print Eftpos Receipts" controls if the Pos will even attempt to print eftpos receipts. If the pinpad is printing the receipt itself, then the POS cannot alter this and you will need to contact your Eftpos vendor. The option "prompt" causes the POS to ask the operator to print or not.
- The option "Print Eftpos Receipts Inline" controls where the receipt is printed by the Pos. If set to "no", then the POS prints the eftpos receipt as soon as the pinpad provides it. If set to "yes", the POS will try and print it inline as part of the sale receipt, but may need to print it immediately under some conditions.
Creating an HTML Receipt Template
An HTML receipt template is a web page that defines how a receipt/invoice should appear
Step by Step
- Visit https://fieldpine.com/docs/receipts/default.htm and select a receipt that is vaguely similar to what you want.
- Right click on the web page, select "view source" and then save that source to your local PC. Lets say you save it as c:\MyStuff\MyReceipt.htm
- Start your point of sale. Start a sale, but do not complete it. This sale will be used to generate the receipt sample
- Open a web browser on the same machine as the point of sale and navigate to http://127.0.0.1:8095/receipt.htm?template=c:\MyStuff\Receipt.htm You should need the current sale drawn using your local receipt format
- Edit the MyReceipt.htm and alter the HTML. Save and press refresh in the browser to see changes. Using in this way the POS will render any active sale to the browser - so you can add various items to see how they render
- When the template is ready for production use, place it on a publically accessible URL and enter that URL into the definition of the receipt format (settings, receipt printing, edit receipt formats)
Understanding the HTML source file
The HTML receipt template is an HTML file that is read and processed by Fieldpine to create a output HTML file that is used in a browser as the final presentation. This is classic "server side rendering" and is used as it is powerful, fast and avoids client side differences.
The replacement phase can be influenced using two methods
- Symbol replacement of keywords contained within % signs.
- Use of HTML tags starting with <Fieldpine These tags are processed and removed before rendering
Using Symbols
Symbols are simple text keywords between two precent (%) characters. The engine replaces symbols with the actual current value
| %DATE% | Date of current sale, not the current date |
| %data.activesale.customer.name% | The customers name associated with the active sale. Or blank/empty if no customer is connected to the sale |
| %data.activesale.store.bankaccountname% | The bank account name for the store where the sale was made |
| %data.printer.width% | The width of the printer to be used in mm. When known. |
There are many symbols available, see Symbols Reference
Using "if" statements
- <fieldpine-if test="%XYZ%">Optional output</fieldpine-if> This form is used to see if the symbol "XYZ" has any non-blank value. If the value is non blank, the optional output is included.
- <fieldpine-if condition="%data.activesale.customer.isreal% ne 0">Optional output</fieldpine-if> This form allows a value test to be performed and if the result of that boolean test is TRUE, the optional output is included. The example test will will only include the optional output if the customer connected to the sale is a real customer, ie any customer record is not marked "default cash customer".
You may nest fieldpine-if statements. All fieldpine-if statements must have a matching closing tag
Repeating Loops
The <fieldpine-repeat> allows you to repeat a block of HTML for each saleline or payment line. Typically this is used when drawing the items on the sale.
In the example below the symbols saleline... vary from loop iteration as the "saleline" is moved to the next one in the sale
<fieldpine-repeat salelines>
<tr><td colspan="4" style="overflow:hidden"><b>%saleline.description%</b></td></tr>
<tr>
<td align="center">%saleline.qty%</td>
<td align="right">%saleline.unitprice%</td>
<td align="right">%saleline.tax_tr1%</td>
<td align="right">%saleline.totalprice%</td>
</tr>
<fieldpine-if test="%saleline.warranty%"><tr><td colspan="4">Warranty: %saleline.warranty%</td></tr></fieldpine-if>
<tr><td colspan="4"> </td></tr>
</fieldpine-repeat>
Notes and Tips
- If printing on narrow receipt printers, we recommand putting the following two lines into your HTML. Collectively they adjust the left and right margins to zero.
<fieldpine-set name="printer.ieprint.header" value=""></fieldpine-set>
<fieldpine-set name="printer.ieprint.footer" value=""></fieldpine-set>
- You can use print preview in your browser to see what the receipt will look like when printed, but you should print it periodically as well. Printed output can sometimes vary from the preview.
- You can use CSS media queries, for example @media print and (min-device-width:180mm) However this can be quite time consuming and difficult in reality especially when trying to size down to 80mm receipt printers. As an alternative you can optionally create two template files to define a format, the 'normal' html definition used generally and an "80mm" html definition that will be selected and used instead if the target device is less than about 120mm wide.
- When listing items purchased in a table, be sure to use <THEAD> for the heading. This will mean a multiple page document will most likely have the headings automatically repeated on each page.
- You may use Javascript on the page to assist with rendering, however your scripts are given a small time window to complete. If they do not complete before we timeout and wish to print, the print occurs regardless.
Adding Product Images
You can include images of the product on the receipt which can be impressive for fashion retailers or those where a picture is more descriptive than product descriptions
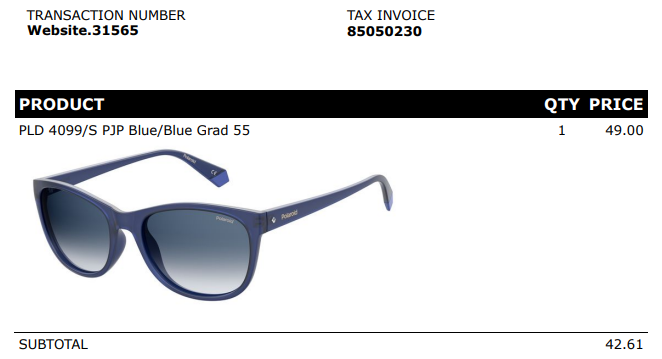
The inclusion of a receipt works by inserting the URL for the product into the receipt template. This URL is loaded by the format engine to actually display the result. Where images have been loaded against products you can use symbols to insert the image. The example above was generated using this code
<td>%saleline.description%
    <fieldpine-if test="%saleline.product.image[camera:side].url%">
        <img src="%saleline.product.image[camera:side].url%" style="max-height:4cm">
    </fieldpine-if>
</td>
This code is specifically requesting an image that has been tagged with the side camera position. If you are happy with
any image, then omit the condition and use: %saleline.product.image[].url%
NB. The "test" in the above example is used to ensure that the <IMG> tag is only inserted when a valid image url is available. Without that
the document will contain broken image links in the browser.