Barcode Scanners Customer Displays Public Product List Scales
Email Accounts Websites
Pre Install Planning Creating a Franchise
Configuring Email Accounts
Your system can be configured to automatically send emails for specific events such as customer sale receipts, supplier purchase orders or even notification of customer order arrival. Advanced users can also configure the system to automatically process incoming emails. If you have an externally provided email to TXT service, then customers can receive small messages as TXT in some instances.
On this page: Anatomy of an Email | How Emails are generated | Creating an Email Account
Anatomy of an Email
While most people see email as a message on their screen, internally emails are reasonably complex with many options. Originally email started out as simple text messages, then had attachments and later support for web page style graphics. This means that creating an email suitable for all recipents can be challenging, especially with rules that might exist on the receivers system, such as attachment removal (anti virus) or not displaying graphics.
General Problems
- General purpose email is not guaranteed to be delivered. You may not receive a "bounce" message if it does not work, but you should.
Main Body
- Email programs will typically display an email in either "text" or "html" mode. As a sender you must send both formats, or at least a message saying something like "this is a HTML message, please view in HTML". Text mode does not have as many formatting options as HTML mode, so things like tables do not always appear nicely laid out.
- When formatting an email, you cannot assume much about the receivers screen size. Many users are now reading email on mobile phones so designing a graphic laden email to fit a desktop screen will probably work, but be awkward for the receiver to read.
Attachments
- If you send attachments, they might block the email from being delivered, but this often only applies for certain types of attachments, such as trying to send executable programs.
- Attachments over a certain size may be blocked.
- You have no way of knowing what the receiver can read. While Adobe PDF files are popular, they are not readable by every user.
How the System Generates Email
The retail system needs to be able to quickly generate emails that are personalised, but also flexible for different needs. This is achieved using a range of "format" files than define how an email should be presented. Format files are defined using two main file types, .txt files and .docx (Word) files. While word files are used to define the layout and appearance they are converted to HTML, PDF and other formats before sending.
Step by Step
- The system decides it needs to send an email to a user. Lets assume that a purchase order is being sent to a supplier.
- The key facts are stored in a message queue for transmission. The key facts here are the supplier and the purchase order. So the system stores supplier id, purchase order id and a format number (401 in this case) that says we wish to send an initial "here is a new purchase order" type of email.
- A background job selects this entry in the message queue for processing. This is done by GDS servers.
- The file "MessageFormat401.txt" is opened if possible. This will be located in the sub folder "messaging" for customer specific versions or the folder "messaging\base" for Fieldpine standard types. If you edit these templates always save your version in the messaging folder or it might be automatically overwritten.
- The txt file verison of messageformat401 contains some email specific headers, such as To, from and subject. It also contains two "body-part" for text and HTML contents. This system sees the two parts and sends the email as a multipart MIME message. Format files can also include directives to attach other format files. Some areas of the system allow you to specify user specific formats, such as sending a purchase order using different appearances to different suppliers.
-
As format files are processed, the system replaces symbols using the %symbol% directives. So you can write email templates such as
Dear %supplier.name%, Here is our purchase order dated %purchaseorder.date%
- Once the base format is processed, attachments are processed in the same manner. You can add several attachments, you can attach the same format file several times in different outputs, such as Word and PDF.
- Text based format files have text and/or html sections only. Any formatting must be done in these files. Word format files define the overall appearance and layout. The rendering engine decodes the Word document, replaces symbols and then tries to produce a near likeness of the word document in the output format. Word is a very advanced format with over 7000 pages defining the internal specification, so most renders can only understand a limited subset of Words abilities, so always test changes to verify they can be displayed.
- Once the individual email has been created, it is submitted directly to your email system. They do not appear in the outbox or sent folder of normal email clients.
Technical Specification
Format files are stored in the messaging subfolder of GDS. The "\messaging" folder is always searched first and contains customer specific editted versions. The sub folder "\messaging\base" contains verisons of files provided by Fieldpine and you should not edit these files directly as this foldert WILL be updated automatically causing your edits to be lost.
Message Formats are all numbered and the number indicates the class of the document. The number is placed at the end of the file name just before the extension. Examples: "Big401.docx" or "PO with confirmation slip 401.docx". The system uses these format numbers to identify messages that are of the same class.
Creating an SMTP account
Using Office 365, or Outlook.com
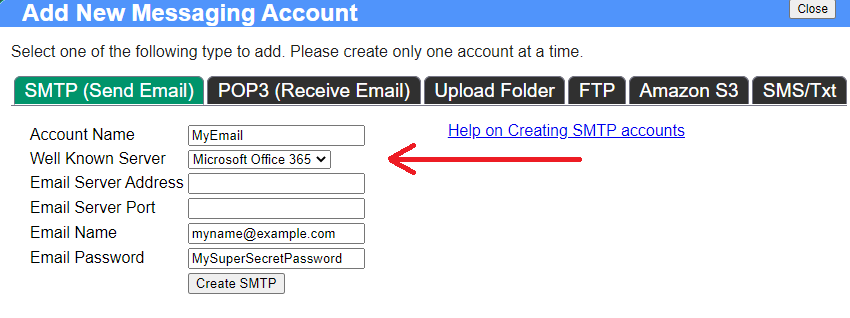
- From the Email & Interfaces menu option, select configure accounts.
- Fill in the details of your email account, your EMAIL login and password is required. If you wish to use fieldpine.com as an email proxy, select the email service
provider you use.
Proxy by Fieldpine? What's that?
In order to simplify email installation, servers at Fieldpine.com can be used to proxy your emails to your email provider. This eliminates needing to install various additional security options in order to talk to your email provider.
- The email is prepared on your machines and forwarded to secure Fieldpine servers for delivery to your email provider
- Fieldpine store the headers of emails, who you are and so on.
- The body of the email may be stored temporarily in log files for support purposes, but is not read or processed in any way. This storing is purely for support purposes.
- This service is not to be used for bulk emailing, it is intended only for normal retail use such as receipts etc. If you need high volume email traffic then install stunnel as detailed below
- After the account is created, click the "Test" button to send an email to yourself. Emails can take 5 or 10 minutes to be dispatched (by design to ensure we don't flood email providers)
Using other email providers, or keeping email "inhouse"
- If your email provider does not require SSL TLS or STARTLS connections, skip to step 4. If you aren't sure, try skipping to step 4 and come back to this step if it doesn't work
- Download and install from stunnel.org You do not need to install certificates.
- Edit the stunnel.conf file and create sections like
[gmail-smtp]
client = yes
accept = 127.0.0.1:25
connect = smtp.gmail.com:465
OR[ISP-smtp] client = yes accept = 127.0.0.1:25 connect = ISP-IP-ADDRESS:465 protocol=smtp
Note, Fieldpine support are not experts on stunnel and are may not be able to assist with precise details for every possible email provider. If you need help we suggest getting and IT support specialist to visit your store and assist you.
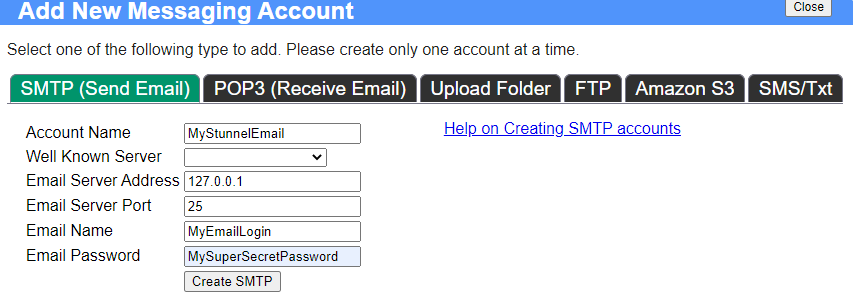
- Create your email account as shown. The server address is 127.0.0.1 and port 25 if you are using Stunnel. If you are not using stunnel then your
email providers address and port should be entered. Email providers vary widely as to which port you should use, you will need to find out the "SMTP Server settings"
- Once the account is created, click "edit", and optionally insert "LOGIN,PLAIN" into the Auth Schemes field. This is generally required, but not always
- After the account is created, click the "Test" button to send an email to yourself. Emails can take 5 or 10 minutes to be dispatched (by design to ensure we don't flood email providers)
- If emails are failing to be delivered, use the View Log feature to identify any errors in configuration
Using Gmail for sending email
-
Install Stunnel to provide the SSL implementation. Stunnel includes a section in its configuration file that defines a connection to the Gmail SMTP server. Ensure this section
is showing.
[gmail-smtp]
client = yes
accept = 127.0.0.1:25
connect = smtp.gmail.com:465
verifyChain = yes
CAfile = ca-certs.pem
checkHost = smtp.gmail.com
OCSPaia = yes
- Login to your Gmail account and enable less secure apps. See https://support.google.com/accounts/answer/6010255 for details
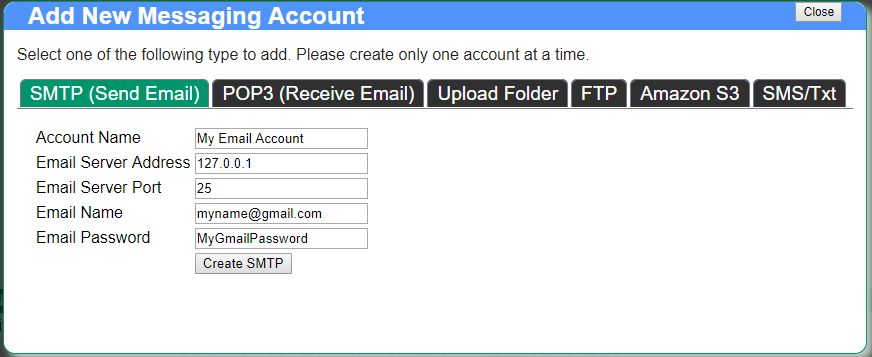
-
Enter your Gmail account details and server details as shown.
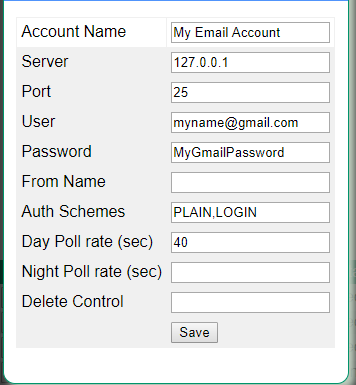
-
After creating the account, press "Edit Config" and enter the Auth Schemes as shown below.
- Once the account is created, press "Test" to queue a test email. This email will probably not be delivered yet as further authentication is required.
-
Click on the "View Log" and wait for the email to be attempted to be sent. If you do not have time to wait, the log should also be stored in \fieldpine\pos\smtp_trace....out.
In the log, search for the section where Google replies asking you to login via a browser. See the example below
7/09/2018 8:44:23 AM
220 smtp.gmail.com ESMTP v82-v6sm7891075pfd.64 - gsmtp
250-smtp.gmail.com at your service, [123.123.123.123]
250-SIZE 35882577
250-8BITMIME
250-AUTH LOGIN PLAIN XOAUTH2 PLAIN-CLIENTTOKEN OAUTHBEARER XOAUTH
250-ENHANCEDSTATUSCODES
250-PIPELINING
250-CHUNKING
250 SMTPUTF8
Connect Worked
ConnectStatus Ok
334 VXNlcm5hbWU6
334 UGFzc3dvcmQ6

534-5.7.14 <https://accounts.google.com/signin/continue?sarp=1&scc=1&plt=AKgnsbth
534-5.7.14 SJDjsdjsjdjksdju3j34jksfjcjn5jhfDFRGDJF4t4kfdhkfh4jht4hEFDF4hghdfhdfjh
534-5.7.14 djeiwj7835337hffVfef33f3rBBGBGB$$$$fdfgbgbgbgbEFEG$G556454623132557isc
534-5.7.14 OLlBpqMRw0PQgzqEtXKnkr9mqEHGfvghEi8SaXNUcrU_afesxcJghd6MGoorOJaMSrc7xc
534-5.7.14 05wK4MhRcqO7fQlTRdpgrhVpDCuDkl5fVg41cDt7TgthS6Aicb> Please log in via
534-5.7.14 your web browser and then try again.

534-5.7.14  Learn more at
534 5.7.14  https://support.google.com/mail/answer/78754 v82-v6sm7891075pfd.64 - gsmtp
530-5.5.1 Authentication Required. Learn more at
530 5.5.1  https://support.google.com/mail/?p=WantAuthError v82-v6sm7891075pfd.64 - gsmtp
- Copy the highlighted URL into your browser, login to your Gmail account and authorise the access.
- Subsequent sending should now work.